Baking Bread
I decided to begin with the Crusty Cob recipe on page 20 of Paul Hollywood’s 100 Great Breads. It’s the first page of Basic Breads, which seemed like a good place to start, and all I have is 1 smallish loaf pan – pyrex – so I figured I’d do a baking-sheet recipe first thing and save myself any worry about the pan being too small, the wrong shape (if I decided to go with the 8×8…) or trying one of the pan recipes on a baking sheet (what if it puddles out and ruins the oven?!). Yep, I’m a worrier when it comes to these experiments.
Providentially, I was reading blogs this morning and Smitten Kitchen’s Tips of the Day for today and yesterday were about yeast and bread baking. There was a link to her Eight Tips for Less Intimidating Bread. This took such a load off my mind! I was really uncertain about the whole “punching down the dough” thing, since Paul didn’t say anything about that but I’ve always heard it’s a big step and that you’re supposed to do it when the dough has “doubled in volume.” But how can you tell? Well, SK cleared that up: just gently deflating it is the thing to do.
But, I’m getting ahead of myself… I measured my flour. I put the salt on one side of the mound and the yeast (active dry, dissolved in water as directed on the packet) on the other side, and attempted to not let them touch as cautioned by Mr. Hollywood – apparently the salt will kill the yeast. Though how you are supposed to mix things together without having them touch eventually is beyond me. Some of the yeast liquid ran over into the salt. Oops.
I “softened†the butter in the microwave but I didn’t want it to melt, so just for 10 seconds… I think it might have been a little cold in the middle. So hopefully the butter isn’t in several big lumps or only worked through 1/2 of the dough! I wonder if maybe it wouldn’t matter to just pour it in melted? Other recipes use oil, which is a liquid. And you want the dough to be warm so it will rise. Also it’s totally freezing today. “Highs in the Lows†as we like to say.
I poured in the water in a few stages and stirred with a silicone spatula. (There’s nothing creepier to me than scraping dough off of a wooden spoon. Eeegh.) Once it was sticking together well I used my hands and mixed it a bit more.
I wanted to do my kneading on the table rather than the counter, since the counter is a bit high and I thought it would be an awkward angle for my arms. I have these heavy plastic placemats from IKEA so I floured up one of those and used it to knead on the table. Both Paul and Smitten advised against adding too much flour during the kneading, so I tried to use the bare minimum. The placemat worked out kind of nice because the dough stuck to it some but I could turn the whole mat before folding over the dough for the next knead. Neat!
I kneaded for 10 minutes which was PH’s recommendation for beginners. I washed out and oiled my big blue bowl (it’s a wonderful Big Blue Bread Bowl) and put my dough ball in there and covered it with a clean dishtowl, orange for contrast. Paul says you don’t have to cover it but I don’t want dust or anything settling on the dough while it sits there for two hours! My apartment is not the most dust-free place. I gently and lovingly placed my dough bowl in the warmest several cubic feet of air in the place: on top of the refrigerator. That’s the only place that really ever gets what you could call warm. We like to keep the thermostat at 61-ish – gasp – but the way our ceiling heat seems to work the upper 1/3 of the rooms get too hot if it’s higher than that. So we’ll see. The dough did grow a lot during those two hours, and I poked it as instructed by SK and all seemed well. Yay!
I lined my baking sheet with parchment paper – fancy unbleached silicone-coated – with no cornmeal, contrary to what Smitten seemed to suggest, because that just seemed like a pain in the neck. Wasn’t in my recipe anyway. I formed my dough into a nice ball (thanks again to SK for the detailed tips!) and placed it on the siliconed-pan. I put the dishtowel back over it and put it back in its little warm zone for another hour. My feet are freezing but heck, the dough is cozy. If this loaf turns out good I won’t have an excuse to turn up the heat on bread-baking days. Though I guess if, like today, it’s also bill-paying day, I won’t let myself make excuses for using any more expensive kilowatt hours than I have to!
I moved the oven rack lower… because PH says that “the longer a loaf takes to color or bake, the drier it will be.†I don’t want the top of the loaf to get dry while it’s waiting for the bottom to bake all the way through. Also, the Crusty Cob recipe has a little anecdote saying that “this bread, which dates back to medieval times, was known as one of the oven bottoms, as this was invariably where it was baked.†So we’ll see how that goes.
One last tricky step – slashing the top. I think you are supposed to do each cut all in one slash, but I couldn’t help sawing a little.
In the little beauty goes!
… Later …
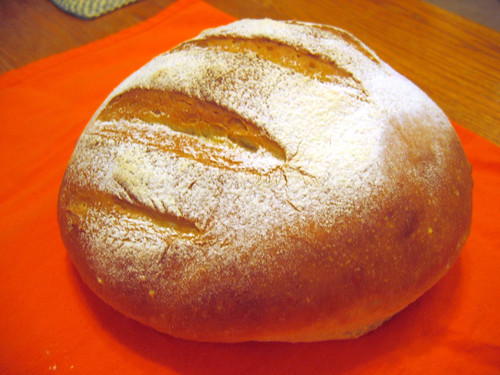
Well, it came out great! We had fresh bread and cream-of-carrot soup for dinner. It was lovely. I baked the bread for 30 minutes, exactly as the recipe said, “or until golden brown†and sure enough it was golden brown after a half hour. And it was done all the way through, but not too done. The only thing is it’s a bit salty. I thought a tablespoon was kind of a lot. Maybe next time I’ll do 2 tsp instead. But I’m very pleased, since this is my first time. And the recipe was great – I followed it to the letter, something I rarely do, but it payed off here. I’m excited to try Hollywood’s other bread recipes and work my way up to expert.
Note: this post was made possible by my darling sister SS, who gifted me the cookbooks this Christmas.
Wow I’m very Impressed your very first time too A+. Its very pretty It looks likes a magazine with special effects!
Love you and your mad skills!
Hannah